This guide provides detailed instructions for setting up and configuring different types of devices with the Atios KNX Bridge. Supported device types are shown below.
When adding devices, make sure to save the configuration during the process to avoid losing your configuration.
- Lightbulb - For controlling lights, with optional brightness and color temperature control
- Switch - For simple on/off controls
- Outlet - For controlling power outlets
- Programmable Switch - For programmable button controls
- Shutter - For controlling blinds, shutters, and window coverings
- Motorized Window - For controlling motorized windows
- Door Lock - For controlling door locks
- Garage Door - For controlling garage doors
- Thermostat - For controlling heating and cooling systems
- Fan - For controlling fans
- Valve - For controlling valves including irrigation systems
- Motion Sensor - For detecting movement
- Occupancy Sensor - For detecting room occupancy
- Contact Sensor - For detecting open/closed states
- Temperature Sensor - For measuring temperature
- DALI Accessories - For controlling DALI lighting systems
¶ Lighting & Switching
¶ Window Coverings
¶ Door Lock
¶ Garage Door
¶ Climate Control
¶ Sensors
¶ DALI Accessories
The following sections provide detailed setup instructions for each device type. Follow the steps for your specific device.
¶ Lighting & Switching
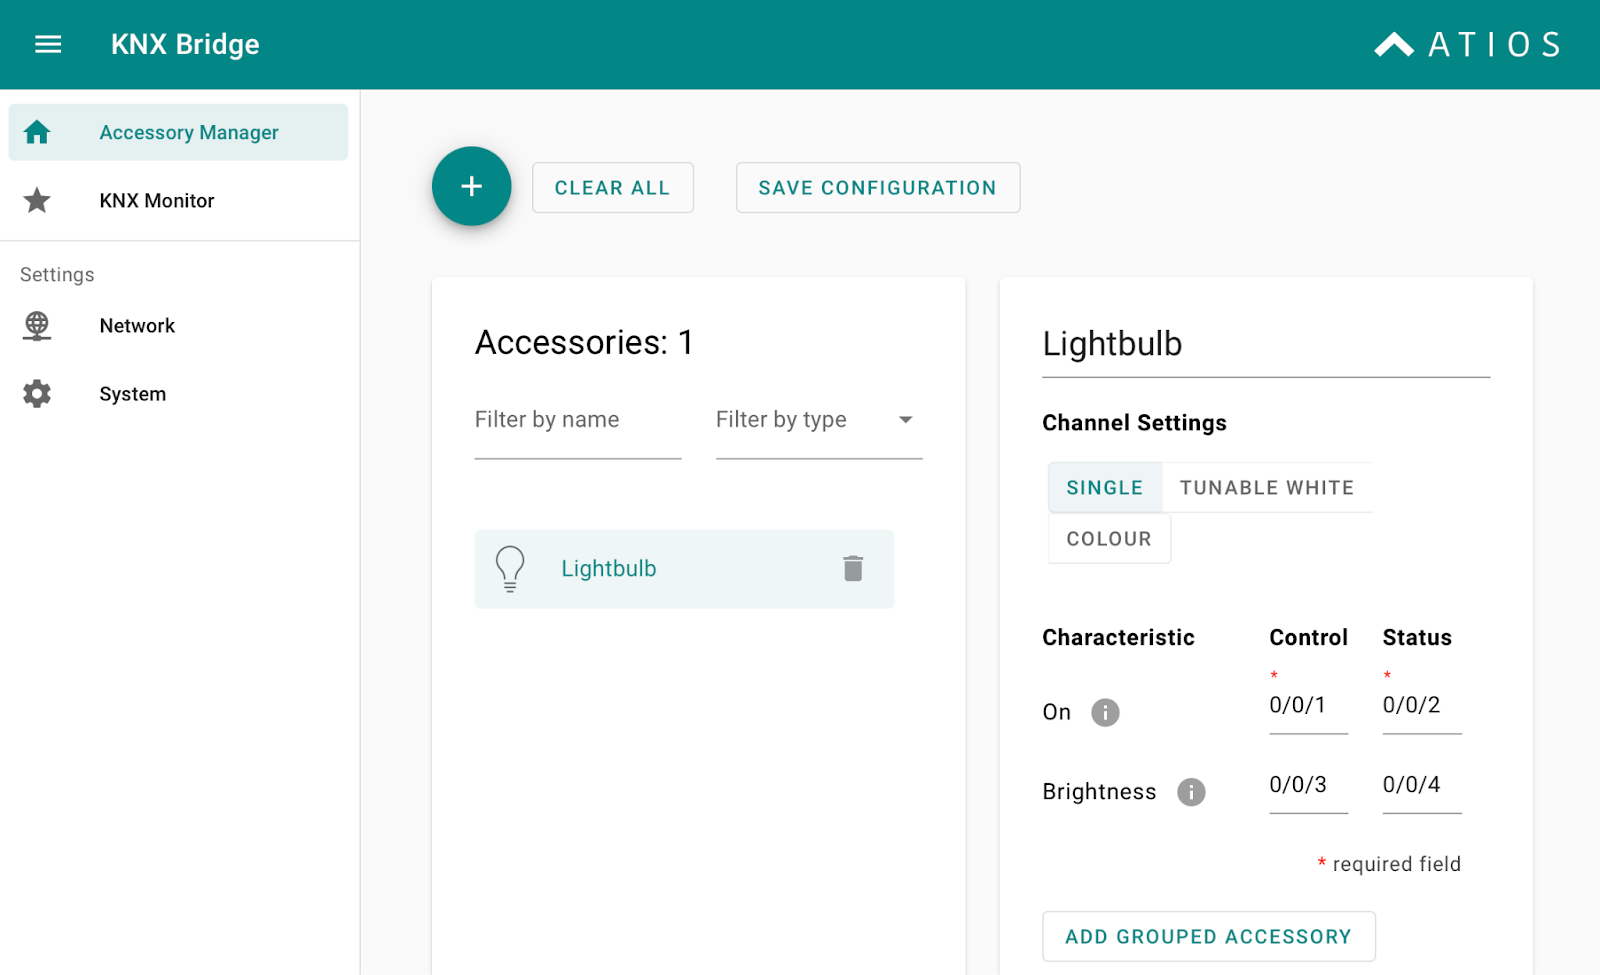
¶ Lightbulb
- Go to Accessory Manager
- Click the + icon
- Select Lightbulb
- Change the name of the accessory by clicking on the name above Characteristic
- Enter the characteristic Control and Status (see below for details)
- Click Save Configuration
To change the name of the Accessory, click on the name (e.g. Lightbulb) and type a new name.
Imagine you have configured your switchable light bulbs in KNX as follows:
| Group Address | Description | Datatype |
| 0/0/1 | Toggles the lamp on or off | DPT-1 |
| 0/0/2 | Status, indicates if the lamp is powered on or off |
DPT-1 |
Fill the KNX group addresses in the Atios Web Interface as follows:
| Characteristic | Control | Status | Datatype |
| On | 0/0/1 | 0/0/2 | DPT-1 |
If the Light Bulb is switched on or off in the app, the telegram is sent to the ControlGroup Address. If you open the Home App after a while and the status is requested, or the Lightbulb is for example controlled by the physical keypad, a KNX telegram is sent to the Status group address, and the following status telegram is read by the KNX Bridge and updated accordingly.
¶ Optional Settings
| Characteristic | Control | Status | Datatype |
| Brightness | 0/0/3 | 0/0/4 | DPT-5 |
| ColourTemperature | 0/0/5 | 0/0/6 | DPT-5 |
To change the name of the Accessory, click on the name (e.g. Lightbulb) and type a new name.
¶ Switch
- Go to Accessory Manager
- Click the + icon
- Select Switch
- Change the name of the accessory by clicking on the name above Characteristic
- Enter the characteristic Control and Status (see below for details)
- Click Save Configuration
Imagine you have configured the switch in KNX as follows:
| Group Address | Description | Datatype |
| 0/0/1 | Toggles the switch on or off | DPT-1 |
| 0/0/2 | Status, indicates if the switch is on or off |
DPT-1 |
Fill out the KNX group addresses in the Atios Web Interface as follows:
| Characteristic | Control | Status | Datatype |
| On | 0/0/1 | 0/0/2 | DPT-1 |

To change the name of the Accessory, click on the name (e.g. Switch) and type a new name.
Outlet
- Go to Accessory Manager
- Click the "+" icon
- Select Outlet
- Change the name of the accessory by clicking on the name above Characteristic
- Enter the characteristic Control and Status (see below for details)
- Click "Save Configuration"
Imagine you have configured the outlet in KNX as follows:
| Group Address | Description | Datatype |
| 0/0/1 | Toggles the outlet on or off | DPT-1 |
| 0/0/2 | Status, indicates if the outlet is on or off |
DPT-1 |
Fill out the KNX group addresses in the Atios Web Interface as follows:
| Characteristic | Control | Status | Datatype |
| On | 0/0/1 | 0/0/2 | DPT-1 |
Programmable Switch
- Go to Accessory Manager
- Click the "+" icon
- Select Programmable Switch
- Change the name of the accessory by clicking on the name above Characteristic
- Enter the characteristic Control and Status (see below for details)
- Click "Save Configuration"
Imagine you have configured the programmable switch in KNX as follows:
| Group Address | Description | Datatype |
| 0/0/1 | Triggers the event the switch was programmed for. |
DPT-1 |
Fill out your KNX group address in the Atios Web Interface as follows:
| Characteristic | Control | Status |
|---|---|---|
| Event | - | 0/0/1 |
If the group address is detected the event is triggered.

To change the name of the Accessory, click on the name (e.g. Programmable Switch) and type a new name.
¶ Window Coverings

To change the name of the Accessory, click on the name (e.g. Outlet) and type a new name.
Shutter
- Go to Accessory Manager
- Click the "+"icon
- Select Shutter
- Change the name of the accessory by clicking on the name above Characteristic
- Enter the characteristic Control and Status
- Click "Save Configuration"
Imagine you have configured a vertical window blind or shutter in KNX as follows:
| Group Address | Description | Datatype |
| 0/0/1 | Long Up/Down, opens or closes the shutter completely |
DPT-1 |
| 0/0/2 | Short Up/Down, step moves the shutter and/or adapts the tilt angle |
DPT-1 |
| 0/0/3 | Position, moves the shutter to a fixed position between 0-100% |
DPT-5 |
| 0/0/4 | Position status, indicates the current position of the shutter |
DPT-5 |
| 0/0/5 | Tilt Position, rotates the slats to afixed angle between 0-100% |
DPT-5 |
| 0/0/6 | Tilt Position status, indicates thecurrent tilt angle between 0-100% |
DPT-5 |
Fill out the KNX group addresses in the Atios Web Interface as follows:
| Characteristic | Control | Status | Datatype |
| Movement | 0/0/1 | 0/0/4 | DPT-1 |
| Stop | 0/0/2 | - | DPT-1 |
| TargetPosition | 0/0/3 | - | DPT-5 |
| CurrentPosition | - | 0/0/4 | DPT-5 |
| TargetTilt | 0/0/5 | - | DPT-5 |
| CurrentTilt | - | 0/0/6 | DPT-5 |

To change the name of the Accessory, click on the name (e.g. Shutter) and type a new name.
Motorized Window
- Go to Accessory Manager
- Click the "+"icon
- Select Motorized Window
- Change the name of the accessory by clicking on the name above Characteristic
- Enter the characteristic Control and Status
- Click "Save Configuration"
Imagine you have configured a motorized window in KNX as follows:
| Group Address | Description | Datatype |
| 0/0/1 | Opens or closes the window completely. |
DPT-1 |
| 0/0/2 | Indicates whether the window is open (1) or closed (0). |
DPT-1 |
| 0/0/3 | Position, moves the window to a fixed position between 0-100%. |
DPT-5 |
| 0/0/4 | Position status, indicates the current position of the window. |
DPT-5 |
Fill out the KNX group addresses in the Atios Web Interface as follows:
| Characteristic | Control | Status | Datatype |
| Movement | 0/0/1 | 0/0/2 | DPT-1 |
| TargetPosition | 0/0/3 | - | DPT-5 |
| CurrentPosition | - | 0/0/4 | DPT-5 |

To change the name of the Accessory, click on the name (e.g. Motorized Window) and type a new name.
¶ Door Lock
Door Lock
- Go to Accessory Manager
- Click the "+" icon
- Select Door Lock
- Change the name of the accessory by clicking on the name above Characteristic
- Enter the characteristic Control and Status (see below for details)
- Click "Save Configuration"
Imagine you have configured the door lock in KNX as follows:
| Group Address | Description | Datatype |
| 0/0/1 | Locks (1) and unlocks (0) the door |
DPT-1 |
| 0/0/2 | Status, indicates if the door is locked (1) or unlocked (0) |
DPT-1 |
Fill out the KNX group addresses in the Atios Web Interface as follows:
| Characteristic | Control | Status | Datatype |
| TargetLockState | 0/0/1 | - | DPT-1 |
| CurrentLockState | - | 0/0/2 | DPT-1 |

To change the name of the Accessory, click on the name (e.g. Door Lock) and type a new name.
¶ Garage Door
Garage Door
A Garage in HomeKit has – contrary to usual in KNX – only binary states. See below for a tip on how to implement this easily in KNX.
- Go to Accessory Manager
- Click the"+"icon
- Select Garage
- Change the name of the accessory by clicking on the name above Characteristic
- Enter the characteristic Control and Status
- Click "Save Configuration"
Imagine you have configured a motorized garage door in ETS as follows:
| Group Address | Description | Datatype |
| 0/0/1 | Opens (0), and closes (1) the garage. |
DPT-1 |
| 0/0/2 | Returns the status of the Garage: 0 = open, 1 = closed. |
DPT-1 |
Fill out the KNX group addresses in the Atios Web Interface as follows:
| Characteristic | Control | Status | Datatype |
| TargetDoorState | 0/0/1 | - | DPT-1 |
| CurrentDoorState | - | 0/0/2 | DPT-1 |
We recommend implementing a garage in KNX with a relay actuator that sends a short impulse, and a binary input that is connected to a reed contact that has contact once the garage door is closed. If you measure the time the garage needs to fully open, you can add this turn-off delay to the binary input, and therefore get an "open" notification in the app only after the time has passed / the door is physically actually open.

To change the name of the Accessory, click on the name (e.g. Garage) and type a new name.
¶ Climate Control
Thermostat
- Go to Accessory Manager
- Click the "+"icon
- Select Thermostat
- You can switch between different modes: heating, cooling and heating + cooling
- Enter the characteristic Control and Status (see below for details)
- Click "Save Configuration"

To change the name of the Accessory, click on the name (e.g. Thermostat) and type a new name.
¶ Example 1: Underfloor heating (heating only)
Set the mode to "Heat".
If the thermostat sends a binary object only, tick the box next to: Thermostat sends DPT 1.001 (On / Off).
Imagine you have configured the heating in ETS as follows:
| GroupAddress | Description | Datatype |
|---|---|---|
| 0/0/1 | Changes to the desired setpoint temperature. |
DPT-9 |
| 0/0/1 | Returns the status of the desired setpoint temperature. |
DPT-9 |
| 0/0/2 | Returns the status of the current temperature. |
DPT-9 |
| 0/0/3 | Sets the operating mode to off (0) or heat (1) |
DPT-1 |
| 0/0/4 | Reads the current operating mode: off (0), heat (1) |
DPT-20 |
Fill out the KNX group addresses in the Atios Web Interface as follows:
| Characteristic | Control | Status | Datatype |
|---|---|---|---|
| TargetTemperature | 0/0/1 | 0/0/1 | DPT-9 |
| CurrentTemperature | - | 0/0/2 | DPT-9 |
| TargetMode | 0/0/3 | - | DPT-1 |
| CurrentMode | - | 0/0/4 | DPT-20 |
| OnOff | - | - | - |
¶ Example 2: Underfloor heating (heating and cooling)
Set the mode to "Heat + Cool".
Imagine you have configured the heating in ETS as follows:
| GroupAddress | Description | Datatype |
|---|---|---|
| 0/0/1 | Changes to the desired setpoint temperature. |
DPT-9 |
| 0/0/1 | Returns the status of the desired setpoint temperature. |
DPT-9 |
| 0/0/2 | Returns the status of the current temperature. |
DPT-9 |
| 0/0/3 | Sets the operating mode to off (0), heat (1) or cool (2) |
DPT-20 |
| 0/0/4 | Reads the current operating mode: off (0), heat (1), cool (2) |
DPT-20 |
Fill out the KNX group addresses in the Atios Web Interface as follows:
| Characteristic | Control | Status | Datatype |
|---|---|---|---|
| TargetTemperature | 0/0/1 | 0/0/1 | DPT-9 |
| CurrentTemperature | - | 0/0/2 | DPT-9 |
| TargetMode | 0/0/3 | - | DPT-20 |
| CurrentMode | - | 0/0/4 | DPT-20 |
| OnOff | - | - | - |
¶ Example 3: Air conditioning
Most air conditioners require an additional on/off object.
Set the mode to "Cool".
Imagine you have configured the heating in ETS as follows:
| GroupAddress | Description | Datatype |
|---|---|---|
| 0/0/1 | Changes to the desired setpoint temperature. |
DPT-9 |
| 0/0/2 | Returns the status of the current temperature. |
DPT-9 |
| 0/0/3 | Sets the operating mode to off (0) or cool (2) |
DPT-20 |
| 0/0/4 | Reads the current operating mode: off (0), cool (2) |
DPT-20 |
| 0/0/5 | Switches the air conditioner on (1) or off (0) |
DPT-1 |
| 0/0/6 | Returns the status of the air conditioner: on (1) or off (0) |
DPT-1 |
Fill out the KNX group addresses in the Atios Web Interface as follows:
| Characteristic | Control | Status | Datatype |
|---|---|---|---|
| TargetTemperature | 0/0/1 | 0/0/1 | DPT-9 |
| CurrentTemperature | - | 0/0/2 | DPT-9 |
| TargetMode | 0/0/3 | - | DPT-20 |
| CurrentMode | - | 0/0/4 | DPT-20 |
| OnOff | 0/0/5 | 0/0/6 | DPT-1 |
Fan
- Go to Accessory Manager
- Click the "+"icon
- Select Fan
- Change the name of the accessory by clicking on the name above Characteristic
- Enter the characteristic Control and Status (see below for details)
- Click "Save Configuration"
Imagine you have configured the fan in KNX as follows:
| Group Address | Description | Datatype |
| 0/0/1 | Switches the fan on (1) or off (0). |
DPT-9 |
| 0/0/2 | Returns the status of the fan: on (1) or off (0) |
DPT-9 |
| 0/0/3 | Sets the rotation speed of the fan. |
DPT-5 |
| 0/0/4 | Reads the current rotation speed. |
DPT-5 |
| 0/0/5 | Switches the swing mode on (1) or off (0) |
DPT-1 |
| 0/0/6 | Returns the status of the swing mode: on (1) or off (0) |
DPT-1 |
Fill out the KNX group addresses in the Atios Web Interface as follows:
| Characteristic | Control | Status | Datatype |
| Active | 0/0/1 | 0/0/2 | DPT-1 |
| RotationSpeed | 0/0/3 | 0/0/4 | DPT-5 |
| SwingMode | 0/0/5 | 0/0/6 | DPT-1 |

To change the name of the Accessory, click on the name (e.g. Fan) and type a new name.
Valve
- Go to Accessory Manager
- Click the "+" icon
- Select Valve
- Choose the type of valve you want to configure. You can choose between generic valve, irrigation valve, shower head and water faucet.
- Change the name of the accessory by clicking on the name above Characteristic
- Enter the characteristic Control and Status (see below for details)
- Click "Save Configuration"
Imagine you have configured the valve in KNX as follows:
| Group Address | Description | Datatype |
| 0/0/1 | Opens (1) or closes (0) the valve | DPT-1 |
| 0/0/2 | Returns the status of the valve, if it is open (1) or closed (0) |
DPT-1 |
Fill out the KNX group addresses in the Atios Web Interface as follows:
| Characteristic | Control | Status | Datatype |
| Active | 0/0/1 | 0/0/2 | DPT-1 |

To change the name of the Accessory, click on the name (e.g. Valve) and type a new name.
¶ Sensors
Motion Sensor
- Go to Accessory Manager
- Click the "+"icon
- Select Motion Sensor
- Change the name of the accessory by clicking on the name above Characteristic
- Enter the characteristic Control and Status (see below for details)
- Click "Save Configuration"
Imagine you have configured the motion sensor in KNX as follows:
| Group Address | Description | Datatype |
| 0/0/1 | Indicates the status of the motion detector (0 = detected motion, 1 = no motion) |
DPT-1 |
Fill out the KNX group address in the Atios Web Interface as follows:
| Characteristic | Control | Status | Datatype |
| MotionDetected | - | 0/0/1 | DPT-1 |

To change the name of the Accessory, click on the name (e.g. Motion Sensor) and type a new name.
Occupancy Sensor
- Go to Accessory Manager
- Click the "+"icon
- Select Occupancy Sensor
- Change the name of the accessory by clicking on the name above Characteristic
- Enter the characteristic Control and Status (see below for details)
- Click "Save Configuration"
Imagine you have configured the occupancy sensor in KNX as follows:
| Group Address | Description | Datatype |
| 0/0/1 | Indicates the status of the motion detector (1 = occupancy detected, 0 = off) |
DPT-1 |
Fill out the KNX group address in the Atios Web Interface as follows:
| Characteristic | Control | Status | Datatype |
| OccupancyDetected | - | 0/0/1 | DPT-1 |

To change the name of the Accessory, click on the name (e.g. Occupancy Sensor) and type a new name.
Contact Sensor
- Go to Accessory Manager
- Click the "+"icon
- Select Contact Sensor
- Change the name of the accessory by clicking on the name above Characteristic
- Enter the characteristic Control and Status (see below for details)
- Click "Save Configuration"
Imagine you have configured the contact sensor in KNX as follows:
| Group Address | Description | Datatype |
| 0/0/1 | Indicates the status of the motion detector (1 = contact detected, 0 = off) |
DPT-1 |
Fill out the KNX group address in the Atios Web Interface as follows:
| Characteristic | Control | Status | Datatype |
| State | - | 0/0/1 | DPT-1 |

To change the name of the Accessory, click on the name (e.g. Contact Sensor) and type a new name.
Temperature Sensor
- Go to Accessory Manager
- Click the "+"icon
- Select Temperature Sensor
- Change the name of the accessory by clicking on the name above Characteristic
- Enter the characteristic Control and Status (see below for details)
- Click "Save Configuration"
Imagine you have configured the temperature sensor in KNX as follows:
| Group Address | Description | Datatype |
| 0/0/1 | Indicates the current temperature | DPT-9 |
Fill out the KNX group address in the Atios Web Interface as follows:
| Characteristic | Control | Status | Datatype |
| CurrentTemperature | - | 0/0/1 | DPT-9 |

To change the name of the Accessory, click on the name (e.g. Temperature Sensor) and type a new name.
¶ DALI Accessories
DALI Accessories
Atios KNX Bridge can act as a KNX-DALI Gateway, see here. This means you can integrate and control DALI accessories from KNX, and therefore also via Matter. But only if you have a necessary KNX System as man-in-the-middle available. If you want to control DALI accessories directly via Matter without KNX, please use our alternative hardware Atios SmartCore.