
KNX Secure
KNX Secure protects your KNX installation against unauthorized access or manipulation. It uses two mechanisms:
KNX Data Secure secures the device itself from unauthorized configuration changes (Secure Commissioning), and optionally also lets you encrypt individual KNX telegrams on the TP bus.
KNX IP Secure encrypts IP traffic, the connection between the KNX Bridge and IP clients like ETS.
A typical installation uses KNX Secure to prevent unauthorized access via IP, which requires Data Secure to be activated. However, encrypting KNX telegrams on the bus adds significant complexity and is rarely used. As long as there is no unauthorized access to the green KNX bus cable, you can avoid this.
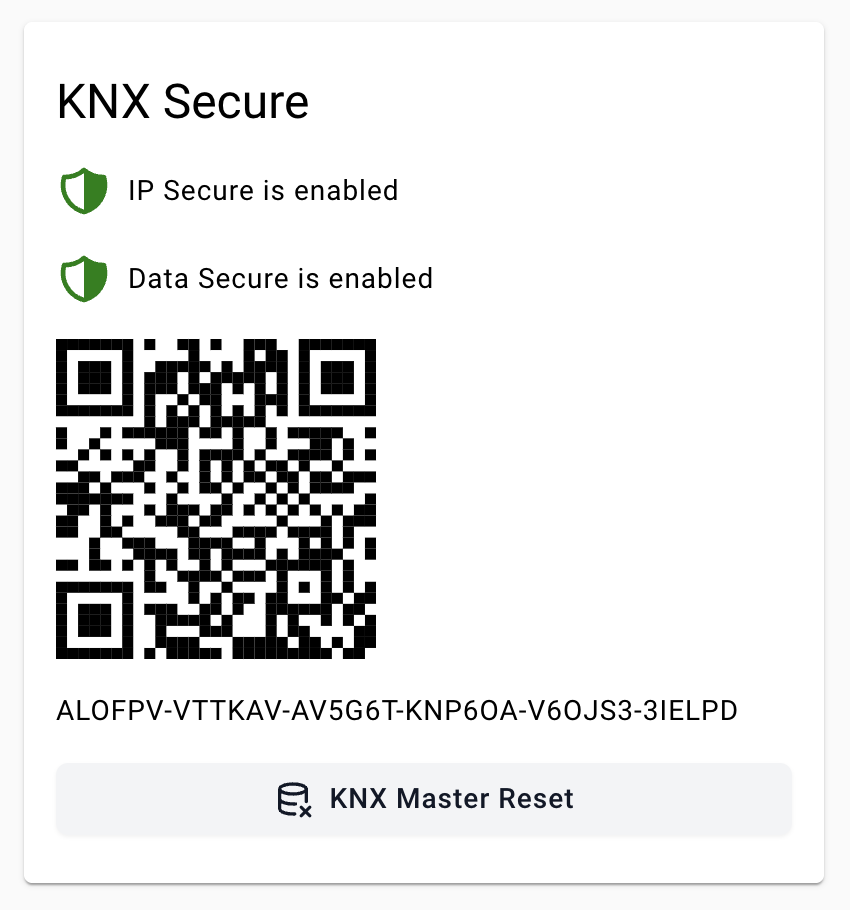
Factory Default Setup Key (FDSK)
Each KNX Secure device has a unique Factory Default Setup Key (FDSK). The FDSK of the Atios KNX Bridge is displayed on the KNX settings page (e.g. ALODDQ-DW4XY3-W5LL77-LLRM7W-22OZE4-3FJBRH) and can also be found on the underside of the device.
Requirements
- ETS 6.0 or higher
- knxprod file: KNX Bridge v3.0 or higher
- KNX Bridge Firmware 3.1.0 or higher
Secure Commissioning
First Atios KNX Bridge
- In the ETS Online Catalogue, navigate to manufacturer Atios AG, select Atios KNX Bridge, Version 3.0 or higher and drag it into your project topology.
- Set a project password when prompted.
- When ETS prompts you to add the FDSK, open the Web Interface.
- Navigate to KNX Settings → KNX Secure and copy the FDSK displayed below the QR code (e.g.
ALOG2M-E4XZO2-CCEC53-L4B6XA-TSKIG4-DFBXTF) and paste it into ETS. - Secure Commissioning and Secure Tunneling are enabled by default.
- Right-click the KNX Bridge in ETS, then select Download Individual Address followed by Download Application.
Already have an Atios KNX Bridge in the ETS project
- In the ETS Online Catalogue, navigate to manufacturer Atios AG, select Atios KNX Bridge, Version 3.0 or higher and drag it into your project topology.
- Set a project password when prompted.
- When ETS prompts you to add the FDSK, click Later.
- Delete the KNX Bridge you just dragged in.
- Click on your existing KNX Bridge in the topology.
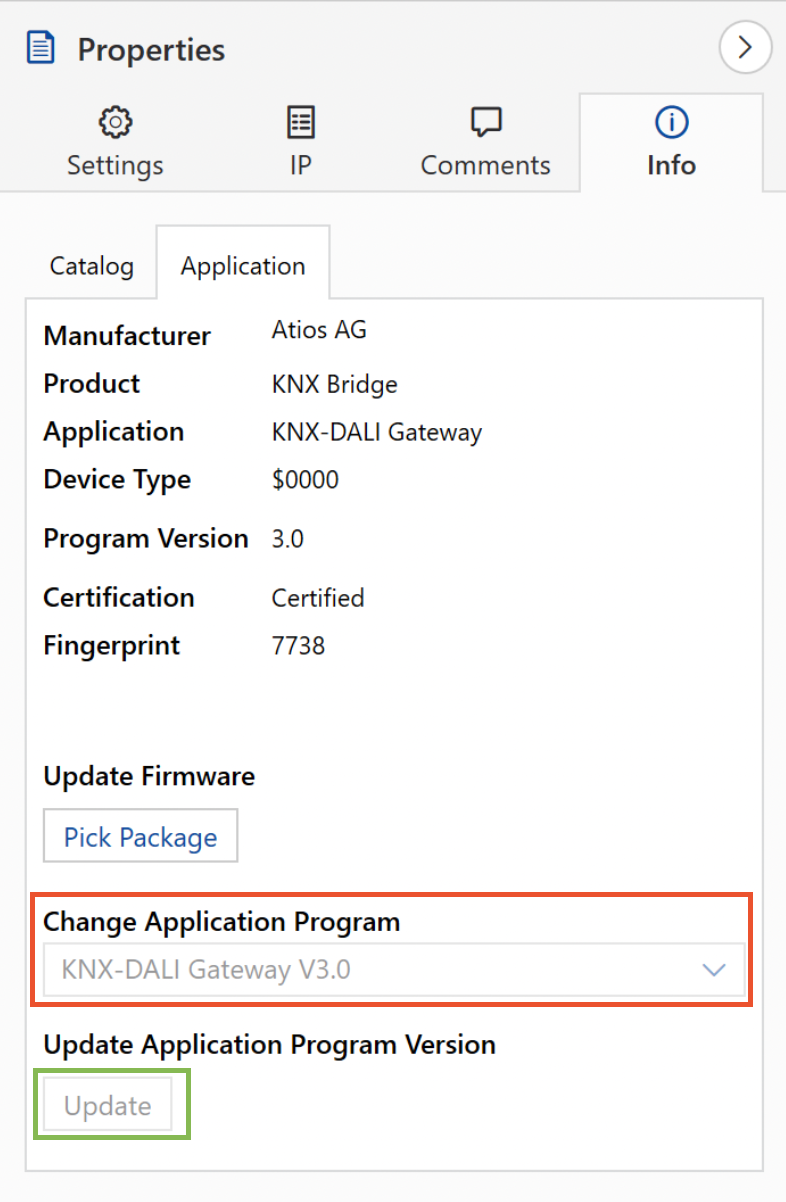
- Go to Properties → Info → Application and click Update at the bottom of the panel.
- Add the FDSK to the existing device via Properties → Settings → Add Device Certificate.
- Right-click the KNX Bridge in ETS and select Download Application.
INFO
You may need to set Secure Commissioning to active first to make the Add Device Certificate button visible.
When updating an existing KNX Bridge
Do not change the application program via the ComboBox. This will erase all your accessories and settings. If this happens by accident, click Undo immediately.
IP Secure Tunneling
IP Secure encrypts IP communication between the Atios KNX Bridge and IP clients. It protects against anyone with network access who might try to read or inject IP telegrams.
How to connect clients (e.g. Home Assistant) to the Atios KNX Bridge
- Expand the Tunnel Address node of the Atios KNX Bridge in the Topology view.
- Select which tunnel the client should use.
- Drag and drop every group address the client should be able to receive or send.
- Export the keyring file via Properties → Settings → Export Interface Information.
- Import the keyring file into the client.
WARNING
Tunnel 4 is reserved for Matter/HomeKit. Use a different tunnel for third-party clients.
Why this is needed: the keyring file contains the authentication code, the keys for every group address dragged into the tunnel, and the user ID needed to open the encrypted IP connection between the Bridge and the client.
Secured Group Addresses (optional)
By default, ETS automatically enables security on group addresses when all connected devices have Secure Commissioning enabled. You can force ETS to enable or disable security for each group address.
Secured group addresses are only necessary if someone could gain physical access to your KNX bus. For typical residential setups, you don't need to secure individual group addresses, since this adds significant complexity.
Secure Group Addresses of the Accessory Manager
- Enable security on the group address (if ETS hasn't done it automatically).
- Drag and drop the group address to Tunnel 4 (Matter/HomeKit).
- Re-download the Application to all connected devices to update their valid-source-address lists.
- Export the keyring file from ETS via Project Details → Security → Backup Keyring.
- Open the Web Interface and import the keyring file (KNX Settings).
Secure Group Addresses for the KNX-DALI Gateway
- Enable security on the group address (if ETS hasn't done it automatically).
- Re-download the Application to the Atios KNX Bridge.
- Re-download the Application to all connected devices.
Why this is needed: the Web Interface manages your Matter accessories and maps them to KNX group addresses. To send commands to or read status from secured group addresses, accessories need the encryption keys which are stored in the keyring. Assigning a group address to Tunnel 4 also tells ETS to add the tunnel address as a valid sender on all connected devices and to update their filter tables. Without that assignment, the Bridge has no key for the address and encrypted telegrams won't reach the actuator.
Updating the keyring after secure changes
Any change to the secure configuration in ETS requires:
- Re-exporting the keyring from ETS.
- Re-importing it into the KNX Bridge Web Interface, and into every other connected third-party system that uses KNX Secure.