
Installation
The Heat6 is a DIN-rail device (MDRC) for the electrical cabinet. It mounts on a 35 mm rail (EN 60715). The valve actuators need their own drive voltage.
Connections
- Valve outputs 1-6: the six triac outputs, on the top edge, one terminal pair per output.
- Drive voltage input: L and N of the 24 V AC or 230 V AC supply for the actuators, on the bottom edge.
- KNX bus: the red/black bus terminal on the bottom edge (− +).
Screw terminals take 0.2-2.5 mm², torque 0.4 N·m. For the full ratings, see the Datasheet.
Mounting and wiring
- Clip the device onto the DIN rail.
- Wire the drive voltage, either 24 V AC or 230 V AC, to the input terminals.
- Wire each valve actuator to its output terminal pair. N is connected internally to the drive voltage input, so you do not have to wire a separate neutral to each output.
- Connect the KNX bus to the bus terminal.
Each channel carries up to 300 mA at 35 °C ambient temperature. The outputs are protected against short circuits and overload, and can report a fault to the bus.
WARNING
All six outputs share one drive voltage. Use actuators of the same voltage on all six outputs, and set that voltage in ETS before you download.
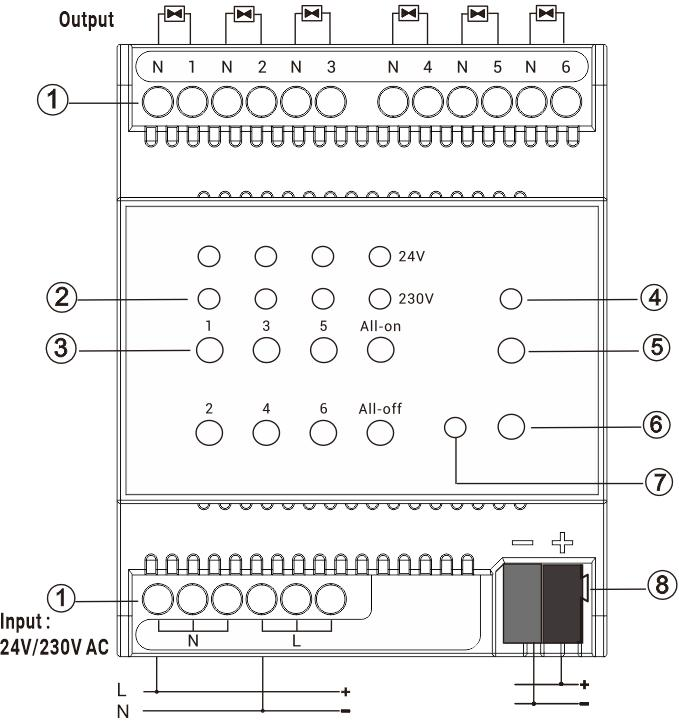
- 1Drive voltage input terminals and valve output terminals, 24 V AC or 230 V AC. N is bridged internally, so the outputs need no separate N connection.
- 2Status LEDs for the valve outputs, and the 24 V and 230 V drive voltage indicators
- 3Manual operation buttons for the valve outputs, with All-on and All-off
- 4Man./Auto. status LED
- 5Man./Auto. switch button
- 6Programming button
- 7Programming LED
- 8KNX bus connection terminal